Showing posts with label recipes. Show all posts

Friday, March 8, 2019

Vegetarian/Vegan braised pork rice (滷肉飯)

Untitled


Because I don't want to blog about any of the serious stuff going on right now (from the Kaohsiung mayor Han Kuo-yu being a racist douchebag to my concerns about International Women's Day in Taiwan to the way the Chinese state treats women as per an excellent piece in Foreign Policy)...

...please enjoy a recipe for the tasty lu rou fan I made for dinner last night, entirely out of vegan ingredients. (Well, the egg obviously is not vegan, but you can just leave that out. Other recipes exist, but I daresay mine captures the essence of this dish, just without meat.

That said, please don't think that it's impossible to tell the difference. Certainly, without all that delicious pork fat and general porkiness, there is a slight difference in taste (and a bit of a sesame undertone, but it's pleasant). I tried to make it up through adding other veggie-friendly ingredients that have meaty, hearty flavors but it's not exactly the same.

The sesame oil and preserved tofu are what give this dish some of the meatiness that the pork would otherwise lend; they are really essential for this reason.

Vegetarian/Vegan Braised Pork Rice (generously serves 3, comfortably serves 4)


Eggs, however many you want (leave these out for vegan cooking), hard boiled and shelled
1 package king oyster mushroom (杏鮑菇)
1 package brush mushroom (I don't actually know the formal name for these but they look like brushes)

1 package dry tofu (豆乾) - I like the I-mei brand which is marinated
1 package regular tofu (豆腐), pressed under a heavy object for at least half an hour
1 cup rice wine (米酒)
1 cup low-sodium soy sauce (薄鹽醬油)
1/2 cup regular soy sauce (醬油)

1 teaspoon five spice powder (五香粉)
1/2 teaspoon white pepper (白胡椒粉)
green onion (蔥), chopped, white and green parts separated
garlic (蒜頭)- three cloves, minced
sesame oil (芝麻油/香油), maybe a quarter cup?
preserved tofu (豆腐乳), the darkest/blackest you can find, 1 tablespoon
fried shallots (炸得小蔥/青蔥), 3/4 cup
sugar (糖) - 1-2 tbsp (to taste)
water (水) - at least 1 cup, more as needed

white rice (白飯) - freshly made and hot
pickled Taiwanese veggies from a jar, if you want

Place the regular tofu on a flat plate with some sort of lip and put something heavy on it - I use a cutting board underneath a teapot full of water. Press for at least 30 minutes until water leaches out.

Bring eggs to room temperature, hard boil, then immediately dunk in icy water to remove shell. Set aside.

Wash all mushrooms.

Mince both kinds of tofu and both kinds of mushroom into tiny cubes - mix together.

In a large wok, heat up sesame oil on medium-low heat. Add the whites of the green onion and the garlic, cook until fragrant (just about a minute). Add the sugar, shallots, white pepper, five spice and preserved tofu, breaking up the tofu so that the whole thing is smooth and oily and liquidy. Add rice wine and bring to a boil. Add both kids of soy sauce and one cup of water, bring to a low simmer. Cook down for a few minutes until everything is well blended, then add your minced mushrooms and tofu, and the eggs. You could also add a few thick slices of ginger, but I don't.

Cook and cook and cook and cook - at least 30 minutes at an absolute minimum, more if you like. You'll want the sauce to be getting thick and gravy-like, the eggs to take on a deep brown color, and the tofu and mushrooms to soak up so much of the sauce that they also become deep brown and look meaty. Add water whenever the sauce gets too thick.

When you feel like it's ready, remove from heat and spoon over hot rice. Each serving should come with one egg.

I like mine to be thick and to 'cover' the rice, so I can mix it in. Some people like it soupier so it soaks into the rice. Either is fine - just add more water if it's too thick, or cook longer if it's too thin. The tofu and mushrooms should hold up to this.

Put some pickled veggies on the side if you like, and garnish with some of the green parts of the onion.

Refrigerates really well - and is actually a bit better re-heated the next day after the braising sauce has really soaked into the tofu and mushrooms, and cooked down again with more water - and probably freezes well, too.

Enjoy!

Saturday, August 25, 2018

The Good, The Bland and the Authentic: A Hakka Stir-Fry Journey

39978163_10156672844911202_2177125141455044608_n


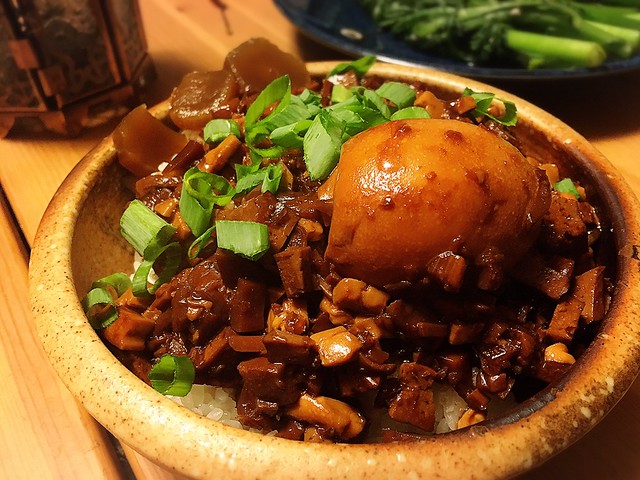
Months ago, I picked up Cathy Erway's The Food of Taiwan, cooked a bunch of my favorite Taiwanese dishes from it, and wrote about the experience. I structured it as a discussion of how it feels to be a foreigner who calls Taiwan home improving her ability to cook Taiwanese food, but also of what makes a Taiwanese dish both "good" and "authentic". Something might be "good" but not taste particularly like a dish as it's usually served in a region (for example, I like the Taiwanese take on ma po doufu 麻婆豆腐. I think it's good, but it doesn't taste anything like what I used to eat in Guizhou and Sichuan). Or, something might be "authentic" - maybe your 92-year-old Hakka grandmother in Yangmei made it - but, as I noted to a friend, not everyone's Hakka grandma is necessarily a good cook.

Of course, the best dishes tend to be both: they're deeply rooted in their places and cultures of origin, and also made well.

I also considered the tendency of Westerners to have endless variations of their own food, while thinking food of other cultures only had one "correct" form, and any deviations from that particular way of preparing it were somehow "wrong" and "inauthentic". Of course this isn't true. Different cooks across Taiwan cook the same dishes in slightly different ways, just as cooks might do from Ohio to Iowa.

With that in mind, I want to return to the Hakka stir-fry (客家小炒) recipe in The Food of Taiwan. There was a discussion on this in the "books about Taiwan" Facebook group I manage about the various aspects of the recipe, and also on my personal page. I complained about the inclusion of carrots and the lack of garlic greens, the lack of rice wine, the way the pork belly was sliced (not into matchsticks as is common in Taiwan, but into slices and pre-cooked), and the lack of specification about the squid, which it is implied in the recipe may be fresh squid. And, I'd like to add, the sparing use of "light soy sauce". Some of my friends - all Hakka - were horrified. Other commenters thought this recipe would make it easier for non-Taiwanese and those not in Taiwan to make a version of the dish, and it was therefore fine.

To me - caveat: someone who is very much not Hakka - this just doesn't produce the Hakka stir-fry I've eaten in Taiwan. It just...doesn't. Maybe it's "good" (I made the recipe, I thought it was...fine. Totally acceptable) but it didn't strike me as at all "authentic". It just wasn't the lip-smacking, flavor-intense dish of greens and chewy matchsticks of tasty pork, tofu and squid that I've come to know and love.

Of course, there's an added issue when you're not just a non-Hakka cooking Hakka food, but a non-Taiwanese cooking a Taiwanese dish. I know I can cook good food, but if I'm going to fry something up and call it authentic, it has to really taste authentic. There is less space for me to spin my own variation on something and call it "Hakka stir fry" (or anything Taiwanese that I might make). If I change things up too much, but claim to be making a particular food from a particular place and culture, I not only become culturally appropriative (not appreciating the host culture) but also forfeit any claim I may have to seeking to better understand Taiwan through learning how to make this food with my own hands.

So, last night, I decided to try again. Instead of using Erway's recipe, I just grabbed the first search result off iCook, just to see how it played out. I cribbed a few of the better elements of Erway's recipe: the use of ginger and chili bean sauce. Hakka friends had told me these were acceptable flavor enhancers and I thought they worked well. I also cooked up the ginger, garlic (not garlic greens) and white parts of the scallions in a little oil before adding the pork.

I also soaked the dried squid in Shaoxing rice wine (紹興酒) with a little water added because that would otherwise require a LOT of Shaoxing wine rather than water, because that's what my friend says his Hakka wife's family does. That's pretty legit.

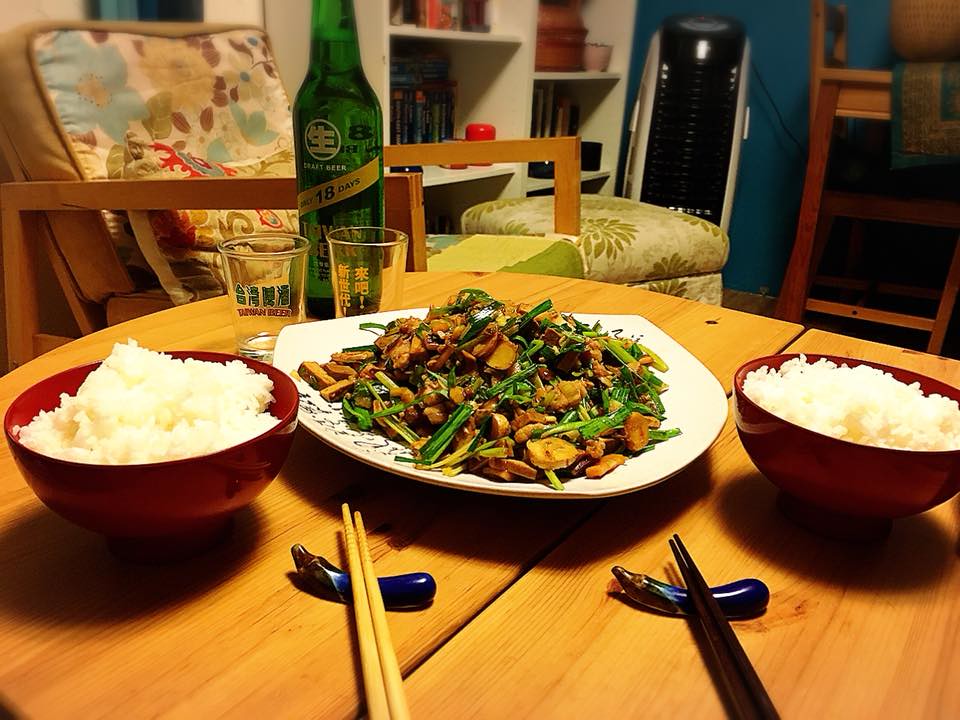
Notably, this recipe called for matchsticked pork cooked in a wok (not boiled), thick soy sauce (醬油膏) rather than light soy sauce (add the chili bean sauce at the same time if you like), sugar, reconstituted dried squid rather than fresh squid, garlic greens along with the celery and scallions, and rice wine. And absolutely no carrots.

I stuck mostly to the iCook recipe to see if it would produce a Hakka stir-fry that was both "good" and "authentic" - and you know what? It did!

39981538_10156672844906202_3757115778541813760_n

Looks pretty solid, no? This not only tasted great, but tasted (and looked) like something I'd get in an actual restaurant in Taiwan.

Contrast that to the result of using Erway's recipe (though I didn't quite follow it - I did use dried squid, I did matchstick my pork, and I did use garlic greens rather than carrot because I have principles). Same "food photography" filter, same level of photo editing:


IMG_2092


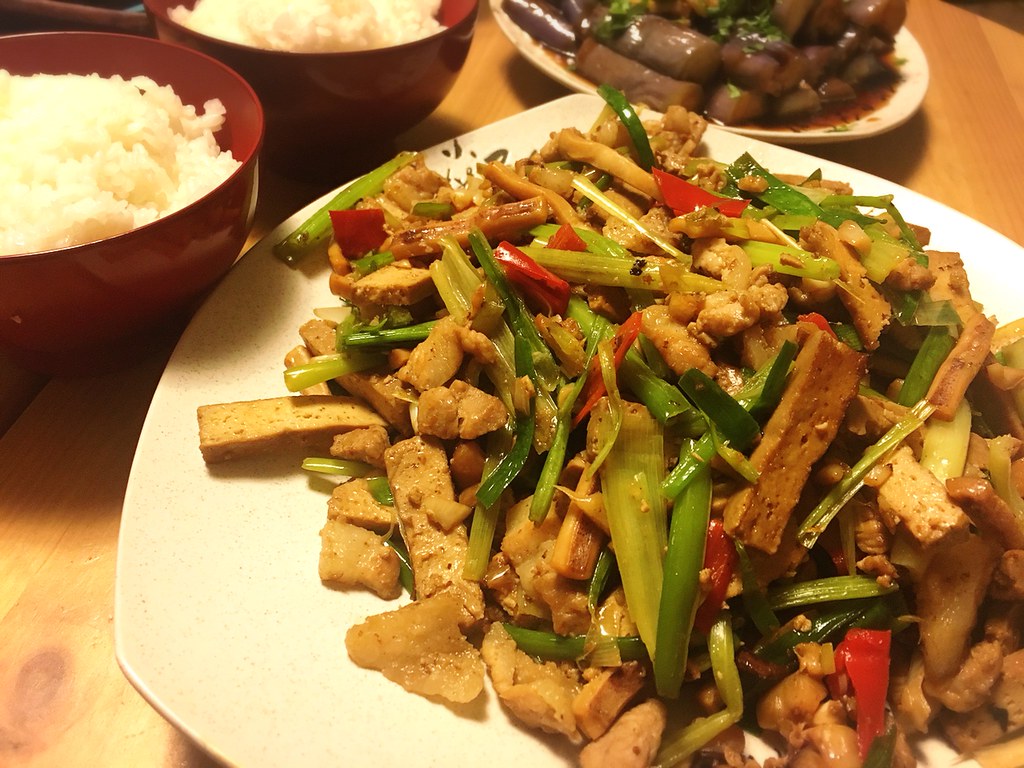
Seems fine, right? But it was a lot blander. It didn't have that thick coating of slightly sweet, soy-based deliciousness tinged with the subtle enhancement of rice wine that the stir-fry I made last night did.

Now, that's not the end of the story. That friend's Hakka wife, from Miaoli? Her family apparently fries up each ingredient separately "to make sure each one is cooked to the peak of fragrance and texture", and doesn't use dried tofu (though she concedes it's an acceptable addition. I happen to like it.)

She's actually Hakka - her version is certainly more "authentic" than mine. And though I've never tried it, I can be pretty damn sure it tastes better, too. I don't believe there's anything genetic about cooking: one doesn't get to be good at cooking Hakka food just because one is Hakka, but I didn't grow up in that culture. I didn't eat this dish as a kid. My family doesn't run a restaurant in Miaoli. There's a lot of experience-based knowledge that I can't have. I accept that.

In the end, though, I can make a pretty okay Hakka stir-fry too, and I do think there's a "way" to do that where "good" and "authentic" intersect.

I am a firm believer in seeking to understand other cultures (not appropriating them), and I appreciate it when certain cultural knowledge - like how to cook commonly-served dishes - is made accessible. I don't think I have to be Hakka to make Hakka stir-fry, or Korean to make kimchi, or Mexican to make flautas (though I'd hesitate to attempt to make a profit doing so). But, if we're going to seek to understand through cooking, we do have to at least attempt to produce the real thing. No carrots, no long slices of pork, no fresh squid, no light soy sauce. Otherwise, we're just making stir-fry and pretending it's 客家小炒. We congratulate ourselves, but have learned nothing.


Here's my full recipe for White Lady Makes Hakka Stir-Fry: 

1 pack of pork belly (五花肉)from the supermarket, sliced into matchsticks (I never get up early enough to go to the traditional market)
3-4 scallions (青蔥) , white and light green section sliced, green sections sliced into thin matchsticks
1 large garlic green (蒜苗) - white bulb section sliced, green sections sliced into matchsticks
1-2 roots (which have several stems) of Chinese celery (芹菜), de-leafed (though you can chop and add the leaves too) and matchsticked
1 pack dried tofu (豆乾), cut into matchsticks
1 dried squid (魷魚乾), soaked in Shaoxing wine (紹興酒) with a little water for a few hours or overnight, with tentacles, sliced up into pieces about the same size as the pork - cut against the grain so it won't curl up when stir-fried
2 cloves garlic (蒜頭), chopped
1 thumb of ginger (薑), in coins
A little neutral-tasting oil (沙拉油) - don't worry about using a little. The fat from the pork will give the dish a satisfying oiliness
1-2 tsp sugar (to taste) (糖)
2 tbsp thick soy sauce (醬油膏) - this is the secret to getting the sauce to stick to the meat/tofu
2 tbsp chili bean sauce (optional) (辣豆瓣醬)
1/4 cup rice wine (米酒)
powdered white pepper to taste (白胡椒粉)

Cook up the garlic, garlic green bulb (the white part), white part of onion and ginger in a little oil until fragrant. (I use medium gas, which would be high on an electric stove.)
Add pork and cook until pink disappears
Add tofu and cook for a minute
Add squid and cook for a minute
Add rice wine, toss
Add thick soy sauce, sugar, white pepper and chili bean sauce, toss till well-coated and it starts to stick to the meat/tofu/squid
Add all remaining greens, cook briefly until slightly wilted

Serve immediately over white rice.

Boom! Done.

Saturday, November 2, 2013

Sauteed Persimmon and Smoked Duck Baguette: A seasonal treat

1240032_10152018931531202_1613492407_n I went to Lalashan recently - that'll be another post once I have more free time - with some friends right smack in the middle of persimmon season. I don't think I'd ever seen a persimmon in the USA (or I did, but I didn't stop to figure out what it was), but between mid-autumn and mid-winter in Taiwan they're everywhere. It's a great chance not only to eat them straight - yum! - but to mix them with yoghurt, bake them into breads (think banana bread but with persimmons), cookies and muffins, put them in fruit salads, but also to cook with them!

What I really wanted to try was a roast duck with persimmon glaze, but having never roasted a duck before, and not giving myself lead time to find a duck to roast - plus I'm not a fan of buying meat still on the bone and cooking it myself - the deboning part is never something I do gracefully - I ended up with a packet of smoked duck slices from City Super instead. 

What I made, however, was absolutely delicious, and a unique way to enjoy persimmon season in Taiwan if you're not into eating them raw, or just don't like them that way. It also just feels seasonally autumnal, in a way that's actually more authentic than pumpkin-based foods (which I also love).

It tastes best if made with just-ripe persimmons. Red and soft enough to have that intense spicy-sweet flavor, but still hard enough to slice up more like a peach than a tomato. A very deep nearly-red orange'll do ya.

You don't have to have this with duck, the two just happen to go very well together.

Makes 2-4 sandwiches

1 good baguette (try Lalos on Anhe Road between Xinyi and Ren'ai)
1 ripe persimmon (see above)
1 pack of boneless smoked duck slices - City Super at SOGO Fuxing Rd. has this, 150-200NT
Soft goat cheese - NT200 worth will do
A good lettuce - no iceberg, nothing too bitter, the sweetish one with green leaves and ruffled red edges does nicely
1/2 lemon (you only need the juice from 1/4 of it though)
Half a thumb sized piece of young ginger, pressed - MUST be young ginger and should be nearly pureed, you can do this in a garlic press
1/4 - 1/2 teaspoon sweet paprika (NOT spicy)
a pinch of cinnamon powder
a pinch of clove powder, or 2 whole cloves
a pinch of nutmeg powder, or 1/2 a crushed whole nutmeg
(optional) a teaspoon of fresh rosemary leaves, chopped and crushed slightly
Oil - any good saute oil, butter may be OK (haven't tried this)
optional: a teaspoon of crisp white wine
A heavy-bottomed pan

Oil your pan with just enough oil to coat evenly and to coat the spices, heat on low
Add crushed ginger and while roasting, prepare other spices
Add other spices, saute on low (DO NOT allow to burn) as you slice your persimmon into "sandwich tomato" style slices
Use spatula to move spices evenly around pan, juice your half lemon
Add 1/2 of the juice to the pan (using more is optional), add rosemary, make sure it's all really evenly distributed around the pan. If you have wine, add it now.
Lay the persimmon slices in this oil-spice-rosemary mix and turn heat to medium-low
Gently saute, occasionally turning, until persimmon slices get a bit transparent around the edges and turn darker in the center, and are well-coated with the mixture
Layer duck slices on top - your goal is not to cook these, but to warm them and mingle the duck and persimmon flavors - continue to saute for about a minute
Turn the duck slices once and saute for another minute, liquid should be more or less cooked off by now
Turn off

Slice your baguette and prepare pieces for your sandwich. Smear top and bottom with soft goat cheese. On the bottom, layer the duck and persimmon (I do duck on the bottom - it doesn't really matter) and then add lettuce on top.

Eat.

YUM! Amirite?

I made a really nice cherry tomato salad with this - a carton of halved cherry tomatoes, several cloves of well-roasted garlic (some shallot would have been good too), basic Italian seasoning (parsley, basil, oregano) with fresh thyme and rosemary, the rest of the lemon juice, some thyme-infused aged rice vinegar, some rosemary infused good olive oil, a pinch of salt and a handful of capers. You could also add cubed hard cheese, roasted shallot, walnuts, whatever to this. 


Thursday, October 3, 2013

Autumn in Taipei: Hipster-iffic pumpkin spice muffins

1380141_10151948440701202_602555372_n

Today's the first day of fall that it's been chilly enough for me to briefly wear a long-sleeved shirt, and we've had a few other cool, gray days recently. So I figured, time to make something delicious and autumnal and rehabilitate the mainstream backlash against pumpkin spice.

For a few hours this week, my apartment has smelled like Hipster Autumn, and I just don't care. I'm not a fan of "pumpkin spice" coffee drinks, because there doesn't seem to be much actual pumpkin flavor in there, and because what flavor there is seems to be mostly artificially manufactured. But pumpkin flavored products with actual pumpkin in them? Sign me up! I love pumpkin! (For real - my favorite pasta is homemade pesto with chunks of sauteed pumpkin).

I couldn't find any canned pumpkin puree - what most people use for their pumpkin baked goods - so I took it up a notch and made my own (it's not that hard - use peeled sliced sliced pumpkin, or even butternut squash, but I prefer real pumpkin, it's got a creaminess, nuttiness and starchiness that butternut squash lacks and purees into a thick, creamy goo whereas butternut squash purees into the texture of applesauce. Cut it into chunks and sautee in nonstick pan with either butter and vegetable oil or butter and water, cover and cook until it's falling apart - with water this will be more like a steaming and with oil it'll be more like a frying - then whizz it in the food processor perhaps with a little water).

I topped it off with maple cream cheese frosting - even better if you add a bit of butter! - dusted with cinnamon and nutmeg and decorated with walnuts, raisins and cinnamon candy. I also baked walnuts and raisins into these delicious things.

And boom! Autumn in Taipei may be somewhat disappointing - you often get good weather but this year we haven't been that lucky, it's never cool/nippy (by the time it gets cool out, it's winter and always overcast), and I'm still in t-shirts - but this recipe will add a little fall to your expat life.

Pumpkin Spice Muffins (OK, cupcakes, shut up)

Liquids:
2 cups pumpkin puree (see above)
1 stick of softened butter (and a little more never hurt...almost anyone)
4 eggs
2 tsp vanilla (REAL vanilla, NO FAKESIES)
A shot of your favorite thing that goes with pumpkin (I used whiskey for my first batch, nothing for my second as a pregnant friend will likely eat one of these) - brandy would also be very nice but stay away from anything too fruity or citrusy as you don't want to overpower the pumpkin
A pinch of almond extract or walnut oil would also be fine, but is optional

Solids:
3 1/2 cups flour (substitute some for ground flaxseed if you wish)
2 cups packed brown sugar - really packed, you want that sweetness
Hefty amounts of ground cinnamon, nutmeg, clove, allspice and ginger (ginger can be fresh grated or powdered, I used powdered as it was easier to distribute in the batter) - and err on the side of too much, not too little (all of these can be purchased at City Super, Jason's or Trinity Indian Store near Taipei City Hall) - a tablespoon of each would not be overdoing it
1 tsp baking soda
3 tsp baking powder
Salt - should be one teaspoon but I find one spoonful from the tiny red spoon in my salt cellar was enough

Other:
Chopped walnuts to taste (I find half a cup works) - these tend to be cheaper at traditional shops and shops that sell traditional goods plus Chinese medicine
Raisins to taste (black ones are better than gold)
Butter or oil for greasing
An oven (sorry, I know these can be hard to come by but a cheapo electric one works)
A muffin tin
Ground cinnamon, nutmeg and other decorations (walnuts, raisins, cinnamon candy, whatever)
A rubber spatula scraper thing

Frosting:
1 packet cream cheese, softened
Half a stick of unsalted butter, softened
2 tablespoons confectioners' sugar
3 tablespoons maple syrup
1 teaspoon vanilla extract (real)
Icing tube and tips (optional - you could just spread it)

Preheat oven to 190C, grease muffin tin (I smear a little butter in each one and use a paper towel to smudge it around for an even coating)

1.) Sift all of the solids together. Use a colander if you don't have a sifter.
2.) Mix solids together completely - use an egg whisk, it retains the fluffiness of the various powders. Trust me.
3.) Mix all of the liquids together, you can do this by hand or give it a whizz with a hand mixer (that's what I did)
4.) Add the liquids to the solids and beat briefly until just about mixed
5.) Add raisins and walnuts if desired
6.) Beat, whisk or hand-mixer it one more time until just mixed but not a second longer (keeps the batter fluffy)
7.) Pour into muffin tin, make sure each depression is full to the top so you'll get a nice "muffin top"
8.) Bake for 20 minutes or until they look done (golden on the sides)
9.) While baking, beat softened cream cheese until fluffy, add butter and beat until fluffy again, add confectioner's sugar and keep beating it, add maple syrup one tablespoon at a time and keep beating. Then add vanilla and beat that too. I find a fork works best. Transfer to icing kit if using one. Do not refrigerate.
10.) Take out muffins, allow to cool. Use rubber spatula to get under the muffin brim and separate the muffin from the tin, this will make it come out more easily (you can usually just gently twist them out)
11.) Since we're not in America and our ovens are not big enough for multiple tins, clean muffin tin, re-grease, re-fill and bake more. Makes about 14 muffins, or 2 full tins + two more.
12.) Allow to cool completely, ice, dust with spices by sifting them through a tiny mesh colander, decorate with whatever you want, and then eat.

If you don't go all glutton and eat them all, you can then refrigerate them.

Thursday, October 20, 2011

Recipes: Beef and Squash Stew with Beer and Mustard


I haven’t posted a lot of recipes or book reviews recently – OK, until about a week ago I hadn’t posted anything much at all. Sooner or later I’ll get around to a double review of Jan Wong’s Red China Blues and Jan Wong’s China.  For now, recipes!

I recently made a dish, based off of thisrecipe, for my in-laws on a chilly Maine day, and it came out extremely well (if quite different from the original). I thought I’d post it here because it can definitely be made in Taiwan, and is perfect for those cold, damp, “oh yeah no central heating in a cement building” Taipei winter days.

Beef and Squash Stew with Beer and Mustard

Ingredients:

4-5 cups cubed butternut squash – you can also use pumpkin, other kinds of squash, or if you are willing to alter the recipe even more, lentils

1 normal size package of cubed stew beef (I avoid chuck personally)

a packet of frozen peas (or fresh peas, whatever)

2 large carrots, peeled and cut into chunks

2-3 large potatoes, peeled (or not!) and cut into chunks

1 red bell pepper, center removed – slice and cut slices in half

1 tart apple, peeled and cut into chunks

Optional add ins: parsnips, celery, green beans, cauliflower, chopped spinach etc..

Handful of finely chopped fresh parsley leaves
Handful of chopped dill weed

Lemon juice (a few squirts to taste)

Salt, pepper to taste

Bay leaves (1-2, optional)

A few coins of ginger or shakes of powdered ginger

2-3 large garlic cloves, crushed or finely chopped

2 bottles of dark beer

1 jar of whatever mustard you like – but avoid the bright yellow French’s stuff – in this recipe you can really taste the difference with expensive mustard

2 soft breadsticks (not the hard kind but the kind you can slice and cut) – you could also use several cups of croutons

Olive oil, water, optional paprika

A few chunks of butter

Large casserole, crock pot or pot, pastry brush


Method:

If baking, preheat oven to 350.  Recipe can be baked, crock-potted or cooked on the stove

Rub down chunks of stew beef with salt, pepper and paprika if desired, sauté in olive oil on medium until they start to brown. About halfway through the browning process add the garlic to nicely roast it. Remove from heat and set aside.

Combine all chopped/chunked vegetables and apple in crock pot, large deep pot or large casserole.  Leave out the red peppers and peas or anything that cooks relatively quickly.

Add 1 tablespoon mustard, other spices/herbs including lemon juice. Add beef when cool, including oil/drippings.

Melt butter and add to mixture. Mix everything together well.

Pour beer into mixture – it shouldn’t come quite to the top but should come near the top.

Bake on 350 for about 1.5 hours – or you could bake it longer at 320. Every 15-20 minutes, use a wooden spoon to stir up the mixture to make sure the stuff on top doesn’t dry out and burn.

Add bell pepper and peas. By now, the butternut squash and apple should have dissolved into the beer and formed a soupy mixture.  Add sifted flour and mix in until suitably thickened. Add additional salt and pepper to taste.

Slice breadsticks down the center to reduce thickness. Use pastry brush to coat completely in mustard, or cover croutons in mustard if you are using those.

Press breadsticks into top of stew about halfway, so they form a top “crust”, or cover in croutons. Return to stove and bake for 15 more minutes, reducing heat to 320 if baking at 350. If cooking on stove or crockpot, take it out, pour into casserole, stick in breadsticks and warm in stove on 350 for 15 minutes. You can also toast the mustard-covered breadsticks and add them to the serving dish if you don’t wish to bake.

Serve in soup bowls, or over rice on plates. Each guest gets a whole or half breadstick – serves about 8, or 4 with leftovers.

Sunday, August 7, 2011

Tastes of Childhood II: Making Fish Cookies in Taipei


In my younger years, whenever I'd go to a family gathering my Aunt Rose (who has since passed on) made these cookies. They were sweet, filled with a soft walnut center and, justifying their namesake, were cut into a herringbone pattern. They were coated with a sugar syrup and were so tooth-achingly sweet that you could only eat one or two.

Aunt Rose would show up with a Tupperware in hand, or, too frugal to buy tupperware, a regular baking tin that she'd wash and bring home. Inside would be layers and layers of sticky-syruped parchment paper separating layers of buttery walnut fish cookies. She'd set them out on a side table and through the gathering people would walk by and swipe a few.

Most of my relatives didn't care for them - too sweet - but as a kid I loved them (exactly because they were so sweet)!

Having recently obtained the recipe or something along the same lines from my mom, I tried to make them today, knowing that they should keep until next week's party if refrigerated well.

Mine turned out delicious, although much softer and more crumbly than Aunt Rose's cookies (and slightly less overwhelmingly sweet - I think my aunts and uncles would like my version more, in fact).

I can't link to a website for this, so I'll give you the recipe. 

The ingredients are: 

Filling: 3 cups of walnuts, finely chopped (cups of walnuts before chopping, not after)

5-6 tablespoons of sugar

1 flat tablespoon ground cinnamon

Mix together and set aside (and walnuts are easy to chop if you can't find pre-finely-chopped ones).


 Dough: 

4 1/2 cups of flour (you could make very buttery cookies with 4, but the extra 1/2 lends them needed cohesion)

2 cups of butter (yes, you read that right)

3 tablespoons of sugar

A dusting of cinnamon powder to taste

1 cap-ful of vanilla extract (my own addition, not in the traditional recipe)

1 egg

1 cup milk (I used goat's milk)

2 teaspoons baking soda


Syrup:

3/4 cup sugar

1/2 cup water

Some lemon juice to taste (don't overdo it)

pastry brush (silicone ones are best)

Glaze:

One egg and 1/3 cup milk beaten together

                                                                                    Different pastry brush


First mix the walnut mixture and set aside.

Then mix dry dough ingredients. Mix sugar into softened butter and then beat an egg into that. Slowly add the dry ingredients and when added and well-mixed, add milk. Mix and knead longer than you usually would for cookies (usually you don't want the gluten in the flour to do that thing it does when you over-mix cookie, cake and muffin dough but for these it adds cohesion). Don't knead as long as you would for bread, though. Allow to sit in a cool place or in the refrigerator as you would sugar cookie dough.

Preheat oven to 375F, or 190C.

Now, make the cookies by rolling small balls (a little smaller than golf balls but larger than walnuts) into ovals, flattening them with your palm and sprinkling a line of walnut mixture down the middle. Then push the ends together to create a dough "packet" filled with walnuts. Like this:


Take a pastry brush and brush them generously with the egg glaze. Take a small pair of scissors, like manicure scissors, and cut thin, close herringbones across the top - pull up a bit as you go to really get the right look (as you can see I was not entirely successful - I think I'll get better with practice).


Bake for 15-20 minutes and, while baking, mix the water, sugar and lemon and boil for 5 minutes. Allow to cool and set aside.

The old recipe calls for you to use tongs and dip the cookies into the syrup while hot, but if you make them super buttery they'll fall apart easily (as with the one above). You can do just as well brushing them with syrup with a pastry brush while still hot. 

What I love about these is that the sugar in the walnut mix melts in the heat and creates a sort of sweet walnut paste filling that is just delectable and not bitter (as walnuts can be).

Allow to cook and separate with parchment paper (you do not want to be wrapping plastic wrap around these babies).

And voila! Mediterranean sweet walnut cookies! 

And while my Aunt Rose's cookies always looked spectacular, not all falling apart like mine, I'd say that mine taste pretty damn good.

Saturday, July 30, 2011

Tastes of Childhood: Making Lahmacun in Taipei

OH YUMMY

I've mentioned before that my mom's side of the family is Armenian from Musa Dagh, Turkey and that this is one of the reasons why we chose Turkey as our next travel destination: to seek out my homeland (or rather, one of my homelands - I'm also Polish, Swiss and generic British/Irish). Of all my many threads of ancestry, my Armenian heritage has always been the most vibrant and the biggest part of my life - I do believe that's because that side of the family came to the USA the most recently, and also because that branch of the family has been the most tenacious in terms of keeping heritage and memories alive. That tends to happen when your family lives through a genocide. When one's great grandfather (in my case, Mehran Renjilian) was a freedom fighter (the Turks would say "terrorist" but they're wrong) in the Armenian resistance...later turned minister. When one's family arrives in the USA after being forced to leave not one, but two countries - the second being Greece as the Nazis closed in.

So, after many years of regaling friends with homecooked Indian food, various appetizers and organizing outings to restaurants, I decided that on the eve of the trip that will mark my generation's first return to Musa Dagh, that I will cook some of the best-loved and most familiar dishes of my childhood.

The party will be in two weeks. I can make some of these dishes in my sleep, quite literally: I've had dreams where I have made hummus from scratch and upon waking up realized that even in my dream I followed exactly the right recipe. I have to admit, though, that there are others that I've eaten plenty of but never attempted to make (such as "fish cookies" which are flavored not with fish but with honey, and derive their name from the herringbone pattern cut across the top), and still others that I've attempted once before, failed at miserably, and never tried again...such as lahmacun.

The last time I made lahmacun, or tried to, I was too scared to attempt the dough, being terrified of trying something that included yeast. Instead I put the tasty topping on soft pita. The pita burned. I took the smoking mess of charred bread and raw meat laid out in a glass casserole out of the oven and plopped it on the counter, where the glass instantly shattered.

You can imagine my trepidation at deciding to not only attempt lahmacun again, but to do so with my tiny electric oven and with real dough made with actual yeast (I'm a great baker of cakes, muffins and such but not so experienced with bread products).

So this weekend was the test run.

My beloved husband helps out in the kitchen as I prepare the lahmacun dough.

I mostly followed this recipe, with a few changes to reflect the flavors I remember from childhood. I would never use ground beef - only lamb will do. Beef is a cop-out. I also added extra garlic, black pepper and allspice to the recipe. The "Armenian spice" I grew up with is made of cumin, paprika, cayenne pepper, black pepper and allspice and that's the combination I created and added.

Ground allspice in my tiny marble mortar&pestle.
 Fortunately, I have a wonderful husband who, while not exactly a kitchen god in his own right, is very good at helping out in the kitchen - chopping, grinding, peeling, mixing, stirring - whatever I may need when my two hands and one brain just aren't enough.

Lahmacun is not just flavored with dry spices and lamb - it also includes the pungent flavors of onion, parsley, mint, tomato, lemon and garlic (and, of course, salt).

Mint and lemon - yum!
 My mom once wrote a short story of her experiences making lahmacun, lamenting that Nana - her grandmother - could always turn out perfect dough circles but hers were eternally lumpy and lopsided.

I have to say that I take after my mother, but it doesn't matter: I care about taste, not looks.


Sorry, Nana. I hope as you look down on me from heaven (despite my not being religious) I hope you will forgive my horrifically uneven dough rounds).
Creating this dish in Taipei was - and will be, when I make it again in two weeks - a collision of memories. My life in Taipei with our assortment of friends here, our decrepit apartment that we'll soon be moving out of for better digs, our insane cat, Chinese class, evenings enjoying Belgian beer at various Da'an cafes or going out for some of the best food I've ever had from around China and the world... and commingled with childhood holidays where we'd serve typical American food - turkey or ham, gratin potatoes, green beans, tossed salad, apple pie - alongside hummus, Armenian string cheese, cheoreg (my mom wrote that recipe!), babaghanoush, pilaf, fish cookies, olives and lahmacun. We'd eat scrambled eggs with string cheese, bacon and cheoreg the next morning sitting around Grandma and Grandpa's kitchen table in their suburban house that is so typically American that I once saw their living room in a TV commercial (except it wasn't theirs - it just happened to be the same pre-fab living room). Running around the backyard with my cousins, all much younger than myself and helping Grandma make deviled eggs - it took years for her to realize that I was, in fact, capable of cooking much more than that.


Those flavors - mahlab (a spice made from the ground pits of a certain cherry), tahini, aromatic lamb, tangy lemon, earthy cumin, pungent mint and parsley, fiery cayenne - are the sensory receptacles of my childhood and going back from there, of my heritage. Despite sweating in a kitchen in Taiwan over a plastic table covered in parchment paper, whereas my great grandmother would have done this first on a rough kitchen counter in rural Turkey and later in Athens, and later still in Troy, New York, I did feel a connection to the feisty woman who passed away when I was 9 and who never did quite become fluent in English. It was also meaningful to me to share this first batch of lahmacun - the food of my childhood - with my ever-amazing husband:


...who, you know, certainly appreciates good food. We ate it as I always have, topped with fresh vegetables (onion, cucumber, tomato, bell pepper, all will do) and a squeeze of lemon.

And it means a lot to me to be able to share this food with my friends in Taipei in just a few short weeks, before we say goodbye until October.

Oh yes, and I made a cucumber yoghurt mint salad, too!


Tuesday, April 5, 2011

Man-Child Brownies

A not-very-good picture of a Man-Child brownie - I tried for a lovely sky blue icing and it ended up looking like toothpaste. Oh well!

As a follow-up to my previous post on baking, here's my recipe for insipidly sweet Man-Child Brownies (I call them Man-Child brownies because they're the sort of thing a five-year-old would go for in terms of sugary awesomeness, but a bit of whiskey thrown in there, and some wheat flour substituted for health, makes them a bit more grown-up).

Ingredients:

8oz baking chocolate - if it's unsweetened, add 1/8 to 1/4 cup confectioner's sugar
1 stick (1/2 cup) unsalted butter
1 1/4 cup regular sugar
1 1/4 cup flour (can substitute up to 1/3 with wheat flour)
3 tbsp ground flaxseed (optional but reduce liquids if you skip)
3 eggs
1/2 shot of your favorite whiskey
2-3 tbsp cocoa powder
tiny pinch of salt
a few handfuls of mini-marshmallows
crushed walnuts
half a bag of chocolate chips
1 tsp vanilla extract
1 tbsp honey (optional)

Icing
Another stick of butter
1 1/2 cup confectioner's sugar
1-2 tbsp milk or whipping cream
food coloring if desired
1 capful vanilla extract
Sprinkles!

Pre-heat oven to 190C (giving directions in C because it's Taiwan). Grease 8 or 9 inch baking pan.

Heat water in a pot with a bowl over the top (or use the metal in-pot steamer stand as I do and put the bowl on that), in bowl put entire cut-up stick of butter and 8 oz broken up baker's chocolate. Heat and stir constantly until melted together, adding confectioner's sugar if the chocolate is unsweetened (this is technically not necessary if you want less sweet brownies).

Pour that mixture in larger bowl and beat in 3 eggs, one egg at a time. Add sugar and flour slowly and mix well. Add flavorings (vanilla extract, cocoa powder for extra chocolate punch, pinch of salt, honey for chewiness) and continue mixing - do not over-mix once flour is added.

Fold in marshmallows, walnuts and chocolate chips. Spread into baking pan. Try to keep marshmallows away from the top (but don't sweat it if some are at the top). Bake for 25-35 minutes or until it looks done at the sides and a fork stuck in the middle comes up clean.

Allow to cool completely.

In bowl, use fork or whisk to beat butter until fluffy. Slowly add confectioner's sugar, vanilla and a bit of milk. Soon it will turn into icing and it should be easy enough to figure out when. Add food coloring if desired. Don't over-refrigerate before use, but don't let it get all melty either. You want it room temp and spreadable.

Spread on cooled brownies and top with sprinkles.

Yum!

These brownies are gooey, heavy, chocolatey and will put you into diabetic shock if you eat too much at once. They're also delicious. Enjoy!

Wednesday, March 16, 2011

Super Healthy Veggie Packed Fried Rice

I made this tasty, vegetable-packed dish today as a different take on the usual greasy, starchy fried rice. It's still got oil (olive) and rice (brown, whole grain) but with this many veggies, healthier fats and grains, flaxseed and optional protein, it's a tasty and colorful alternative to the usual stick-to-your-butt-no-matter-how-often-you-bike options in restaurants in Taipei.

It turned out fantastic - both flavor-wise and appearance-wise, with a lot of colorful veggies including pumpkin, red and yellow bell pepper, carrot and purple and green beetroot leaves. It was like a harvest-time reinterpretation of the fried rice genre!

1 cup brown rice
olive oil - need not be extra virgin or fancy (the flavor of extra virgin would get lost in cooking)
a pat of butter (optional)
1 whole bell pepper (or 1/2 each of two different colors of bell pepper)
2 cups of beetroot leaves (they're the ones in the market that are purple on one side and dark green on the other)
1/2 large carrot
1/2 small pumpkin (the gourd-like ones sold in Taiwanese day markets)
1/2 small sweet onion
To taste (optional): Thai fried shallots, black bean sauce, Lao Gan Ma, huajiao "flower pepper", salt, black pepper, fresh red chilis, sesame oil, soy sauce, paprika, vinegar, lemon juice, de-stemmed chopped cilantro, chopped fresh garlic, pulverized fresh ginger

three tbsp ground flaxseed (optional but really good for you)
a small amount of extra virgin olive oil and sesame oil to taste (optional)

Begin the long process to cook brown rice (it takes quite a while), adding a bit of salt, pepper and paprika to the water. Remember that brown rice requires more water (about 50% more), more heat, more steam and more time than white rice.

Set some water to boil to cook the pumpkin (if you want to be super-cool, cook the pumpkin chunks, including peeled skin, first, take out the skin and throw it away, set the cooked pumpkin aside and use the water to cook the rice to give it more nutrients and more flavor).

Wash and chop the onion and bell pepper, set aside
Wash, de-stem and chop beetroot leaves, set aside
Wash and grate or julienne carrot, including skin, add to beetroot leaves, set aside
Use a peeler to de-skin the small pumpkin, scoop out seeds, cut into chunks and boil until just cooked.

Wipe down a wok with just enough olive oil to comfortably cook, add chopped and powdered spices/salt to taste (no liquids yet, but you can add black bean paste, Lao Gan Ma etc). Cook on low/medium until it smells good. Immediately add bell peppers and onions and stir in thoroughly. Add soy sauce, vinegar, lemon juice to taste. Raise to medium heat.

When that is almost but not quite cooked, add beetroot leaves and grated carrot and cook until the leaves go a bit soft (not too soft). Add pumpkin. Mix well on medium (adding a bit of water if it gets a bit dry and threatens to burn).

Add cooked brown rice (ideally you prepared the rice well in advance as brown rice takes forever). Mix well and add flaxseed, stir in.

Add pat of butter and/or any flavoring oils at the end and stir well until it melts evenly into the mix.

The pumpkin should disintegrate somewhat and provide some consistency to the fried rice, but if you like the kind of rice that can be shaped into a dome, mix in one egg and mix well until thoroughly cooked in.

You can also add 1/3 cup cooked yellow lentils and/or walnuts, almonds or cashews if you want some protein (you can also add meat for that matter)!

Note: you can substitute or add vegetables - mushrooms would be great, as would small chunks of cauliflower or sweet potato leaves in lieu of beetroot. You could add tomatoes, bok choi, corn...really whatever you want.

Serve hot.


Tuesday, February 8, 2011

It's Biriyani-Pilaf Fusion Night!

I'm working on two fairly long posts on two tough topics: cultural appropriation and sexism in the workplace for female expats - but it's going to be another week at least before either is published. I'm thinkin' I might actually do a 2nd draft of each, which will be a big change from my usual habit of "blurble on and on following my thoughts and hit 'Publish'." :)

In the meantime, enjoy this awesome recipe for fusion brown rice biriyani-pilaf - one of the many foreign dishes I routinely cook in Taipei with ingredients available locally.

(Serves 2)

Ingredients:

1.5 cups brown rice, pref. organic
6 dates, pitted if possible
A cup of nuts (cashews are best but almonds or peanuts would do)
One large carrot
Small chunks or slivers of pre-cooked meat (cured pepper beef or ham, pre-cooked beef liver or pan-cooked mutton or chicken in spices would all do - I totally used the last nub of cured pepper ham in our fridge) - optional
2 heaping teaspoons ground flaxseed
Finely sliced and grated orange peel
1 tbsp ginger, cut into coins or crushed
As much garlic as you can stand
olive oil
Sesame oil (optional)
salt
ground cumin, black pepper, turmeric, coriander seed, paprika, allspice (about 1 tsp each, give or take for taste and freshness) - all available at Trinity Superstores near City Hall MRT or at Jason's or even Wellcome - you don't need all of these spices, it's really to your taste. You only really need the cumin, pepper and turmeric
Salt to taste
A dash of cinnamon (optional)
cayenne pepper to taste (optional)
lemon juice to taste (about 1/5 cup for me)
2 tablespoons butter (optional)

Method:

Begin the cooking of your brown rice (this takes time - for every cup of rice use 2.5 cups water and a dash of salt) - You can use white or basmati rice but I try to be healthy with the brown

Julienne your carrot - I have a julienne peeler that I got as a Christmas gift and love so YAY - including the skin
Chop up your dates
Chop up your optional meat
Put nuts, dates, carrot and meat (already cooked if not cured) into a bowl and set aside

Sliver or crush your garlic
Measure out your spices
Coin or crush your ginger
Sliver or grind your orange peel

Put as much olive oil as you think you'll need into your pan - I use a wok because I'm awesome. You don't need extra virgin olive oil as the flavors in that cook off most of the time - but you can drizzle a little extra virgin over it when it's done.

Add dry spices, ginger, garlic, orange peel, turn on low heat and cook until lightly roasted and it smells awesome.

Add lemon juice, allow to heat up a bit and then dump in the carrot/nut/meat/date mixture, cook gently on low-medium heat until it smells good and looks just lightly cooked (you don't want it getting too soggy)

Add brown rice which should have already been cooked and mix together stir-fry style. When everything is well mixed and colored with the spices (should be yellow from the turmeric), add a tiny bit of sesame oil (good for you!) and monter a buerre (bad for you but oh so good) with the butter. Mix in flaxseed quickly (very very good for you) and serve hot.

If you want to do even better, substitute 1/3 of the rice with cooked yellow lentils, mixed right in (or just add lentils) - don't overcook them to soup consistency; you want them cooked so that they retain some structure and cohesion but of course soft enough that they are pleasant to eat, and lentils taste great with the spices in this recipe!

You can also customize this recipe with vegetables you like by adding or substituting: bell peppers, tomatoes, well-chopped spinach, cauliflower, onions and mushrooms all work a treat.

Sunday, December 26, 2010

Vaguely Pagan Christmas Punch

Feel like your guests might be wallflowers (a common problem in Taiwan)? Want to get them a little more animated? Try this! It really works! Author tested!

It's also got a nice flavor - lemon juice tempers the harshness of all the alcohol (like any good punch), and the herbal elements lend it a vaguely pagan, Solstice-y undertone. The caffeine in the black tea keeps people awake - plus tea was an ingredient in historic punches so it's totally legit. While the alcohol de-wallflowers them. The ginger and cranberry give it a nice Christmassy feel. Enjoy!

Jenna's Vaguely Pagan Christmas Punch

full pot of black tea (5-6 bags of Taj Mahal black tea boiled in a pot is good too)
at least 7-10 ginger "coins", or chopped ginger
a few handfuls of lemongrass and kaffir lime leaves (to taste)
a ton of sugar (a few cups should do) - brown or white depending on taste
a liter of cranberry juice
a large bottle of lemon juice
2 cans ginger ale
a bottle of brandy (500ML is OK) (doesn't have to be fancy)
3/4 bottle of rum (can be cheap but not too cheap)
3/4 bottle of bourbon (can be expensive or just Jim Beam)
1/2 bottle lemongrass liqueur (Marie Brizard is fine)
a tray of ice
a dash of Cointreau or Grand Marnier if you feel like it
a crushed nutmeg if you feel like it

Instructions:

Boil a pot of tea with tea bags, ginger rounds, and lemongrass/kaffir lime leaf to taste, and all the sugar until it dissolves and makes a sweet, strong herbal black tea. Throw in the tray of ice to cool it down.

Once cool, sift out the tea bags and spices and pour into a large punch-making bowl or bucket. Add the cranberry juice, lemon juice and all the alcohol. Stop and taste, add ginger ale, mix and taste again. Adjust for flavor/perosnal taste.

Serve in a punch bowl with a large hunk of ice (ice frozen in a bowl will do well), garnished with ginger if you like.

Sunday, November 15, 2009

Kung Po Chicken Ding (宮保雞丁)

That's the menu name of kung pao chicken that my sister found in a Chinese restaurant in the Hudson Valley. Awesome.

Anyway, the other night I made kung pao chicken and invited a few friends over to help us eat it. Best NT $620 (for ingredients) that I ever spent. One friend provided beer, another saved the day with hua jiao (花椒) when my local Wellcome turned out to be sold out. Not as good as the fresh hua jiao used in the Sichuan restaurant in Dingxi that has my heart, but still good. Two more brought desserts, including a selection from My Sweetie Pie, the awesome bakery owned by Grandma Nitti's.

The meaning of "gong bao" (or as we say in the American language, "kung pao") is "palace guard" - a lot of Chinese food has fancy names like "Buddha Jumps Over A Wall", "Cross The Bridge Noodles", "Eight Treasures", "Four Gods Soup" etc. that don't really tell you what it is. So this one is Palace Guard Diced Chicken (ji ding).

I realize every kung pao chicken recipe is different, but here is mine (serves 6-8)

Ingredients:

Eight breasts of chicken (I bought 4 packages from Wellcome with appeared to have approx. 2 breasts' worth of meat each in them)

Unroasted, unsalted peanuts - at least 2 cups or to taste

1 sprig of green onion, chopped into chunks

2 cloves of garlic finely minced (optional but I would never leave it out)

a few ginger coins - about half a thumb's worth (optional)

1 tall shot glass or larger Chinese tea cup full of Shaoxing rice wine - no you can't use cheap cooking wine or some other kind of cheaper rice wine. NO YOU CANT NO NO NO! Dry sherry would be OK, though, as that will mimic the effect that the flavor has on the sauce, or a really good, rich rice wine.

1/2 cup regular soy sauce or 1 cup low sodium light soy sauce

1 capful of rice vinegar

sprinkle of sugar to taste - I put about half a palmful

salt to taste

1 tbsp lemon juice (optional or to taste - I like the tangy flavor it gives the sauce)

A **** ton of cooking oil...you can use olive oil if you like (I know that sounds weird but it actually works)

sesame oil - 1 tbsp or to taste

If you like - it's my little secret - a sprinkling of squid oil. You can't taste it in the final product, but it lends this amazing, full, rounded flavor even under all the chili (below)

And now, for the best part!

2 handfuls (or to taste) of hua jiao - flower pepper, which creates that classic numbing feeling
2-3 tbsp Lao Gan Ma black bean peanut chili in oil from Guizhou
handfuls and handfuls of dried red chilis - really you can't overdo this, but you can underdo it, so figure out the point where it seems ridiculous then add some more
about 1 tbsp black pepper
3-4 chopped fresh red Sichuan chilis (any small, thin red chili will do)
Some of that not-too-spicy chili paste with garlic and vinegar you can buy cheaply at Wellcome

(In the USA, all you need is some chopped fresh chili, dried chili and hua jiao, though a chili paste would also be good - not all of the above may be easily available)

Process:

Dice the chicken breasts and put in bowl, adding the soy sauce, vinegar, lemon juice, salt to taste, shaoxing wine, sugar, a bit of the garlic, and the chili pastes. Set aside.

In a wok or large pan with huge lip, heat the cooking oil. In it, lightly roast the black pepper, flower pepper, dried chilis, the rest of the garlic and ginger until it smells awesome. Use as much oil as you like - if the whole mess is deep fried it's great, but if you just want to stir fry, that's OK too. I stir-fry because I'd like to not have a heart attack when I'm 34.

Add peanuts. Just dump 'em in.

Cook peanuts until lightly golden. Add chicken. You can add the whole marinade for a more 'cooked' taste, or if you want the raw awesome of all that chili, leave it out for now.

Cook chicken until tender and just exactly done - when I think this is happening I take a larger chunk out, cut it in half on a cutting board and check the center. Do not overcook. Nothing is more gross than overcooked chicken, except maybe overcooked fish.

Quickly add the chopped onion, giving it a few whisks around in the hot mess, before turning off.

Use a slotted spoon or other straining thing to get the chicken, onion and dried chilis onto the plate while leaving behind the **** ton of oil. If you did not add the marinade to the mess, dump as much of it over now as you like. (adding it while cooking makes it taste 'cooked', adding it after makes it taste 'raw' - I like it both ways.)

Breathe fire, young grasshopper!